


Tutorial Details
- Program: Adobe Photoshop CS3+
- Difficulty: Beginner
- Estimated Completion Time: 10 - 15 Minutes
Final Product What You'll Be Creating

In today’s quick tip tutorial we will demonstrate how to create a sparkling text animation in Photoshop with just a few easy steps. Let’s get started!
Step 1
Open a new document. Select the Gradient Tool and fill the backgroundwith #911169 to #5b1569.

Step 2
Choose a font and type out a word or a phrase. I chose the word star and used the Bauhaus 93 font. Fill it with #e76dbf.

Cmd + J the layer two times. You should now have three identical layers.

Next select the star’s layer and go to Filter > Noise > Add Noise and add a different amount of noise to each layer. I chose 20, 21, and 22.

Step 3
Download these star brushes. Create a new layer on top of each of the text layers. Select the brush tool and place some stars on top of your text. Be sure to create a different pattern for each text layer.


Step 4
Go to Window > Animation and create three frames.

The first word layer and the first sparkle layer should be active on the first frame. See the image below to see which layer should be selected on which frame. Frame delay time should be 0.2 sec. Now press play.

Step 5
The last step is to save our animation so go to File > Save for Web and Devices and save it as a gif file.

Final Image
That’s it! We’re finished! You can see some additional examples below.
Additional Examples

Hello everyone! In today’s quick tip tutorial I will demonstrate how to create a really nice bas relief effect using a texture, any picture, and Photoshop’s 3D tools. Let’s get started!
Tutorial Details
- Program: Adobe Photoshop CS4 Extended
- Difficulty: Beginner
- Estimated Completion Time: 3 - 5 Minutes
Download Source Files
- Source files for this tutorial are available to Premium members.
Get a Premium Membership

Resources Used
The following resources were used in the production of this tutorial:
Step 1
Create a New Document in any size you want, in this case mine is 1024 x 968 px at 72dpi, RGB. Fill the Background with any dark color (Black #000000 in this case) and create a new layer above it named "Plane", then fill this layer with another lighter color, like 50% gray.

Step 2
Select the "Plane" layer and go to 3D > Plane. This action will create a 3D Layer with the gray background as Diffuse texture.

Step 3
Select the "Plane" 3D layer and show the 3D Tools panel (Window > 3D). Select the Scene object and under Global Ambient Color set this one: #FFFFFF (White). You can change Anti-Alias to Best for a better rendering.

Step 4
Double click at the "Diffuse" Texture on the Layers Panel. A New window will appear showing the texture’s layers, then open the "Wood Texture", select it, copy it on the clipboard and paste it to the texture file into a new layer. Save the texture file and go back to your main document, you’ll see the texture applied to the "Plane" layer.

Step 5
Click on the "Materials" Button on the 3D panel, then, next to the Bump Strength box, click on the tiny button next to it and select New Texture. Make the size of the new Texture layer exactly the same than your document (1024 x 768 px) and hit OK to commit.

Step 6
Double Click on the brand new "Bump" texture layer created in the previous step and just like the diffuse texture, a new window will appear. On this new document paste the "Lion Statue" picture into a new layer, you can do further editing here such as removing the white borders but it’s optional since it has white background as well as the document background. Finally using the Hue/Saturation panel (Command + U) lower the saturation to -100 (you can use any other technique to make it 100% grayscale) and save it.

Step 7
As an additional detail I’m using a swirl brush to paint details around the Bump texture, remember to always use a gray color for best results. Save the texture document, close it and go back to the main document, and you’ll see the bump texture applied.

Step 8
Using the 3D transformation tools, rotate the layer a little bit (if you have doubts on how to use the 3D tools take a look at my Basic Guide to Photoshop’s 3D Tools). Then, on the Bump Strength box, change the value from 1 to 5 (this is very important, if you want more strength on the effect try with a larger number), and set both Glossiness and Shininess to 0% to remove undesired reflections.

Step 9
If you would like to try something different, change the Diffuse Texture (Double click on the Diffuse texture on layers panel) and on the texture file, add a new layer with another texture, in this case a brushed metal. After that, save the texture layer and you’ll see the bas relief effect applied to this new texture. You can also change the Glossiness and Shininess values on the material to add some reflections.

Conclusion
Really simple right? You can also try this effect with different materials and images.

This very useful lesson will show you and teach how to create very modern and advanced photography flash menu. To create this lesson, you have to use eight photos and flash 8 filters. You have alos used action script code to make this lesson. You will also learn:
1. How to design photo menu,
2. How to apply action script code on it,
3. How to animate it,
4. How to import any photos into a flash and much more!
You can use this modern menu for any web site. Let's go!
Step 1
Open a new flash document. Select Modify > Document (shortcut key: Ctrl+J ). Set the width of your document to 440 pixels and the height to 400 pixels. Select white as background color and set your Flash movie's frame rate to 28 fps. Then, click ok.

Step 2
Download my photos to quickly create this tutorial. After you have downloaded my photos, unzip the zip file and place that pictures on some folder.
Step 3
Choose File > Import > Import to Library. In the file explorer window that appears, find a eight photos (photo1, photo2...) and Shift-click to select them all.Then click open. If you now open your flash library (Ctrl+L key) you will see a four photos that you just imported. See the picture below.

Step 4
Take the Selection Tool (V), and using the "drag and drop" technique, move the all photos from the library on the stage, and place it on the position like it is shown on the picture below.

Step 5
Take the Selection Tool (V) and select the first photo and press F8 key on the keyboard (Convert to Symbol) to convert this photo into a Movie Clip Symbol.

Step 6
While the new made Movie Clip is still selected, go to the Properties Panel below the stage. On the left side, You will find the Instance name input field there. Call this Movie Clip photo1. See the picture below.

Step 7
Double-click on the movie clip on stage with the Selection tool(V).You should now be inside the Movie Clip.

Step 8
While the photo is still selected, press again F8 key (Convert to Symbol) to convert this photo again into a Movie Clip Symbol.

Step 9
Click after that on frame 15 and press F6 key. While You're still on frame 15, take the Selection Tool (V) and click once on the photo to select it. After that, go to the Properties Panel (Ctrl+F3) below the stage.Click on the Filters tab in the Properties Panel.After that, click on the plus icon and select the Bevel filter. Make the adjustements as follows:
1. Blur X and Y : 20
2. Quality : Low
3. Strenght: 1000%
4. Shadow and Highlight:#666666
5. Type:Inner

Now, you have this:

Step 10
Right-click again anywhere on the gray area between the frame 1 and frame 15 on the timeline and choose Create Motion Tween from the menu that appears.

Step 11
Create a new layer above the layer 1 and name it text. Click on frame 15 of layer text and press F6 key.
Step 12
After that, take the Text Tool (A) and go to the Properties Panel (Ctrl+F3) below the stage. Then, choose the following options:
1. Select a Static Text field ,
2. Select a Trebuchet MS as font.
3. Choose 11 as font size,
4. Select white as color,
5. As the rendering option, select Use Anti-alias for readability.

Then, type on the down right line of photos "About us". See the picture below.

Step 13
Press after that F6 key four times.
Step 14
Then, click on frame 16 and 18 and press delete key on the keyboard.See the picture below.

Step 15
We're done with animation and it's time for action script, so go back on the main scene (Scene 1).

Step 16
Double click on layer 1 to rename its name into a photography menu. After that, create a new layer above the layer photograpy menu and name it invisible button.
Step 17
Then, create the invisible button ove the first photo. See the picture below.

Step 18
Take the Selection Tool (V), click once on the invisible button to select it and go the Action Script Panel (Shortcut key: F9). Then, enter the following action script code inside the actions panel:
on (rollOver) {
_root.mouse_over_photo1 = true;
} on (rollOut) {
_root.mouse_over_photo1 = fstartlse;
} on (release){
getURL("http://www.flashvault.net/");
}
Step 19
Create a new layer above the invisible button layer and name it action.
Step 20
Click on the first frame of layer action , go again to the Action Script Panel (F9), and enter this code inside the action panel:
_root.photo1.onEnterFrame = function() {
if (mouse_over_photo1) {
_root.photo1.nextFrame();
} else {
_root.photo1.prevFrame();
}
};
We're done with the first photo. Repeat this process for every other photos in menu.Only difference is that you must to use another instanca name.
Enjoy!
[Via flashvault]
Preview
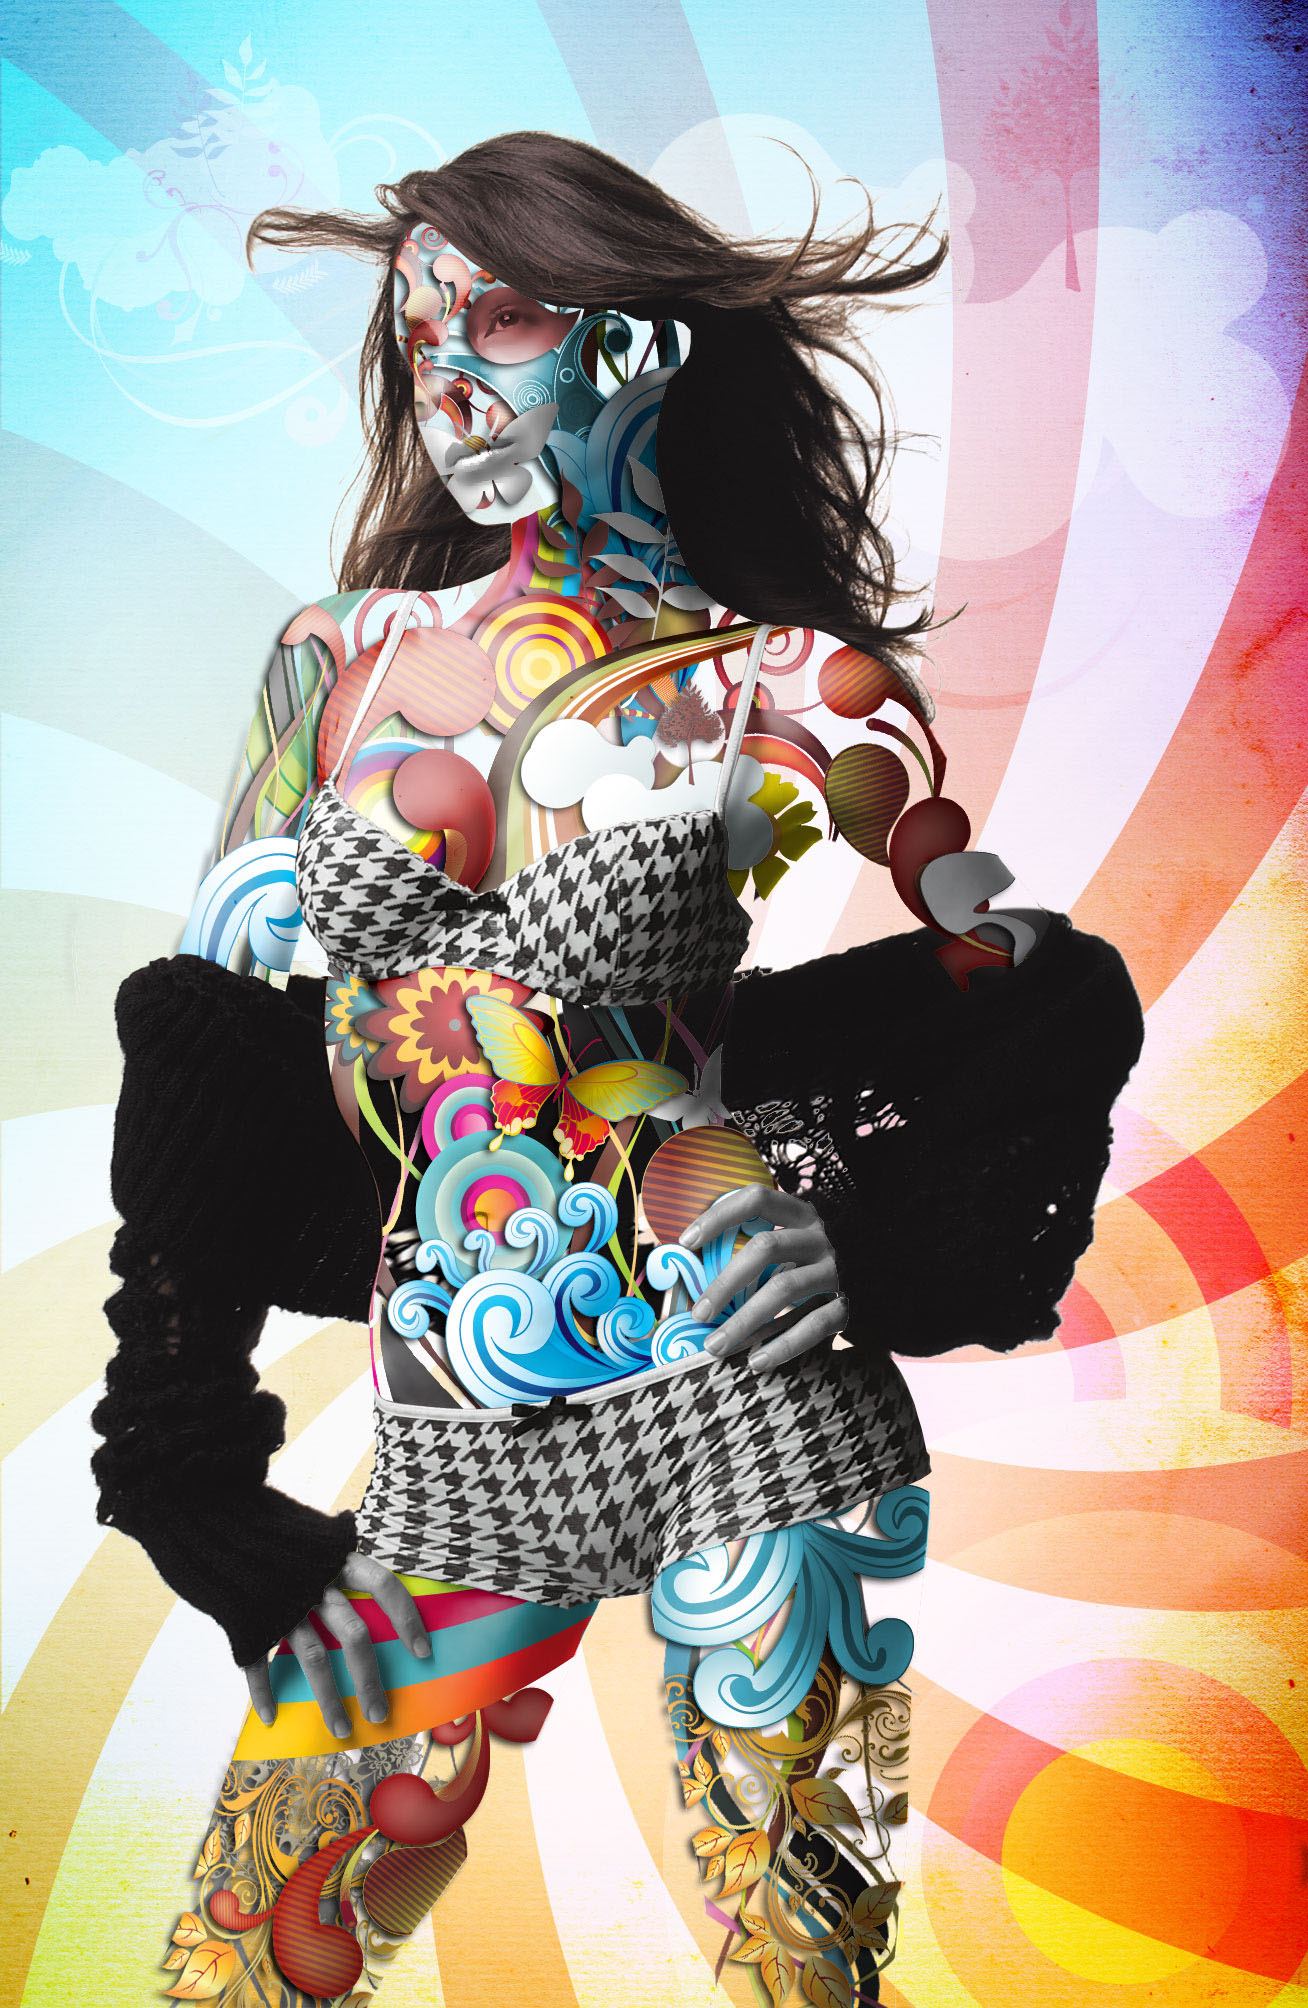
Resources
Here is a list of graphics assets that we will use.
Model
Vectors
- new world vector by GWEB STOCK
- Vector Design 3 by Karen Bachini
- Swirls Vector Illustrations Set by Designious Studio
- butterfly Flowers vector by coolwing
- Colorful backgrounds by PinkMoustache
- Scroll Clouds by PinkMoustache
- WG Funny Swirls Vol1 by Sebastiano Guerriero
- 2 Fashion Music Vector
- Colorful cloud
- Ornament Eps
Texture
Step 1: Separate the model’s swimwear into a new layer
To begin, import the model into Photoshop (Female Stock 26 from the Resources listing).

Take out the Pen Tool (P) and draw a selection around the subject’s clothes (her swimwear). When you have finished the selection, right-click inside it and choose Make Selection to convert the path you just drew into a selection.

Now press Ctrl/Cmd + J to copy the subject’s swimwear (the selected area) as a new layer.

Step 2: Separate the model’s skin areas into a new layer
In the same way as Step 1, select around the skin of the model with the Pen Tool (P) and make it a new layer. Name this layer as "skin" to keep the work organized.

Step 3: Desaturate the skin layer
Now, having the skin layer selected, go to Image > Adjustments > Desaturate (Shift + Ctrl/Cmd + U) to desaturate the skin.
Then adjust the exposure levels (Image > Adjustments > Exposure) of the skin layer. You can utilize the following option values:
- Exposure: +0.19
- Offset: +0.0020
- Gamma Correction: 1.16


Step 4: Create the coat and hair layer
Still on the skin layer, choose the Magic Wand Tool (W) from the Tools Panel, and select around the skin of our subject (as shown below).

Once finished, right-click on the magic wand selection in the canvas and choose Save Selection so that Photoshop remembers this selection for later.
Now select the "main layer" and go to Select > Load Selection; choose the previously saved selection in the drop down list of the Channel option.
Once the selection is loaded, press Ctrl/Cmd + J to separate the hair, coat and swimwear into a new layer.
Erase the swimwear in the new layer by loading a selection around the swimwear layer (Ctrl/Cmd + click on its thumbnail in the Layers Panel), going back to the new layer, and pressing the Delete key. You might have to erase any remaining swimwear areas manually with the Eraser Tool (E). We’re removing this from the new layer since we already have it in another layer.

Step 5: Create the layer with the model’s hands
Go ahead and select the "skin" layer and make a selection around the fingers with the Pen Tool (P), covert it to a selection (right-click inside the pen’s path and choose Make Selection) and then create a new layer with only the subject’s hands on it (Ctrl/Cmd + J).

Put the "skin" and "layer 0" beneath all the layers.
Step 6: Importing vectors from illustrator to Photoshop
Open our first vector resource (new world vector in the Resources listing) in Adobe Illustrator and select a vector shape with the Move Tool (V). Tip: hold Shift to select multiple vector shapes in the artboard.

Once the vector is selected, just drag and drop into your work area in Photoshop.
After importing the vector into Photoshop, right-click the vector layer and select Rasterize Layer.
Afterwards, use the Move Tool (V) to position the vector on the subject’s right thigh (I named this layer "vector 1i").


Step 7: Cut out excess areas of the vector shape
Select the shape of the vector with the Magic Wand Tool (W).
Then use the same selection on the "skin" layer and press (Ctrl/Cmd + J) to cut the skin layer into the shape of vector. Name the layer "vector 1".


Step 8: Apply a Smart Blur on "vector 1" layer
With the "vector 1" layer selected, go to Filter > Blur > Smart Blur and adjust the Radius to 3.0 and Threshold to 25.0.

Step 9: Change the blending mode
Now select the "vector 1i" layer and change the blending mode to Overlay to let a little bit of its background show through.

After that, select both "vector 1" and "vector 1i" layers in the Layers Panel by holding down Ctrl/Cmd while clicking on them. Once selected, right-click on one of them and choose Merge Layers.
Erase unwanted parts manually with the Eraser Tool (E).

Step 10: Choose vectors to import into the scene
Vectors must be chosen very carefully because they are central to the aesthetics and concept of the design. In the following example, I have chosen a vector that resembles water (Vector Design 3 from the Resources listing).

Step 11: Placing the vector
When incorporating the vectors, first open them in Illustrator, select them with the Selection Tool (V) and then import to Photoshop via drag and drop, as indicated in previous steps—this will be the general process for importing all the vectors into the piece. I started my design from abdomen.

Step 12: Selecting the skin
Having the vector layer active, make a selection around it with Magic Wand Tool (W).
Afterwards, use the selection on the "skin" layer to cut the skin into the vector design shape. Press Ctrl/Cmd + J to make the selected skin a new layer, and name the layer "vector2".


Step13: Apply a Smart Blur on the vector layer
With the "vector2" layer selected, go to Filter > Blur > Smart Blur. Change the values of Radius to 3.0 and Threshold to about 25.

Step 14: Rasterizing imported vector layers
When the vector is imported into Photoshop, it appears as a Vector Smart Object automatically. As a Vector Smart Object, vectors cannot be edited or transformed, so right-click on this layer in the Layers Panel and pick Rasterize Layer. Name the layer "vector 2i".


Step 15: Change the blending mode to Overlay
Select the "vector 2i" layer and change the blending mode to Overlay. Then select both the "vector2" layers, right-click on one of them and then choose Merge Layers.

Step 16: Applying shadows on vectors
All the layers should be given a drop shadow to show that they are on top of one another.
I have imported a new vector (Swirls Vector Illustrations Set from the Resources listing) in the similar way as mentioned in the above steps and placed it under the "vector2" layer.
Right-click on the "vector2" layer and then select Blending Options to open up the Layer Styles dialog window. Apply a Drop Shadow layer style, setting the Distance to 6px and Size to about 8px.


Step 17: Sequence of Designing
Now it’s time to use your own creative license to arrange the rest of the vectors. Use suggested vectors from the Resources listing—or use your own vectors—to fill in the remaining spaces of our subject using the techniques we have covered in the preceding steps.


Step 18: Fill the gaps
Since there are gaps in between the vectors, the coat of the subject must be visible through them.
Select a part of the coat with the Lasso Tool (L) and press Ctrl/Cmd + J to create a new layer from the chosen area.

Utilize the Free Transform command (Ctrl/Cmd + T) to stretch the previously created layer to the right side of the model.

Step 19: Painting to fill the remaining gaps
Now make a new layer beneath the "coat" layer and select an area near left elbow with the Lasso Tool (L).

Get the Paint Bucket Tool (G) and fill the selected part with a dark grey colour (#403d3d).
Then use the Brush Tool (B) with a brush tip set to an airbrush and Flow to 50% to paint one end with a darker grey colour (#222121).

Step 20: Create the background
Though some artists like starting from the bottommost layer (the background of the composition), I prefer focusing on the subject and then designing the background of it as one of the final steps (which makes sense, since the subject is the central focus of the viewer).
Pick a background that matches the design theme. I found a colourful texture set (Texture Set 38 in the Resource listing) that adds a certain depth and texture to our vector woman.

Step 21: Final details
To finish off the composition, I selected a few more vectors like sunrays, clouds and circles and placed them above the texture background layer (see the Resources listing to find suggestions of what vectors to use). I changed the blending mode of the sunrays layer to Overlay and the other vectors to Soft Light to let a bit of the texture show through them.

Tutorial Summary
In this tutorial, I have displayed a method for using stock vectors to create an interesting and popular effect that can be seen in print magazines and advertisements. We used Photoshop to compose the scene. We isolated and separated different parts of our subject into several layers to make it easier for us to work with. We used various vector files, opening them in Illustrator and then importing them into Photoshop. We covered a technique or two for retouching the spots that have gaps in them. Finally, we finished the piece with a textured background and some more vectors for details.
I hope you enjoyed this tutorial. Share your thoughts and ask your questions in the comments. Don’t be shy to show us your own version by including it in the Design Instruct Flickr group pool.
Download Tutorial Source Files
- vector_woman_composition (ZIP, 21.9 MB)
[Via designinstruct]
