Motion Tweens in Flash CS3
-step 16
Motion Tweens in Flash CS3 are a very useful feature. Basically we specify the positions of the symbol in the keyframes and Flash creates the animation be(tween) the two keyframes. This gives us a smooth animation.
Let's use the tween feature as we continue with the tutorial to make the wheel animate smoothly.
Wheel Animation - Part 2
Motion Tween
To create the motion tween between the keyframes in the "wheel animation" movie clip:
- Right Click on the 1st frame in the timeline (or any of the frames in between the 2 keyframes).
- From the options that appear, select “Create Motion Tween”.
- An arrow will appear between the 1st and 5th frames on the timeline. This will create a smooth animation between the wheel in frame 1 and the wheel in frame 5.
- Click on the 5th, 10th and 15th frames and create motion tweens.
- Your wheel animation is ready.
- You can get an idea of how it looks by testing the movie.
Control > Test Movie
- Click on Scene 1 to go back to the main stage area.
- Double click on the zoom tool to see the actual stage dimensions.
- Make copies of the wheel as required.
- This is what your stage will look like now.
- When you test the movie you will notice that all the wheel are turning.
Lock Layers in Flash CS3
-step 17
Locking layers in Flash CS3 is useful when we want to manipulate some elements on the stage without disturbing any of the others. Another option that is helpful is the hide layer option. This will hide the layer so that we can work more easily as the number of elements on the stage increase, but will still appear in the final output.
Continuing with the tutorial, let us use the Lock Layer option to easily select the various parts of the train.
Train Animation
Now that we have all the parts of the train ready, we are ready to animate it.
- Select all the parts of the train (including wheels).
- The easiest way to select all the parts of the train is to lock all the other layers first so that the elements in those layers don't get selected.
- To lock a layer, click on the dot below the lock symbol next to the layer name in the timeline.
- Another easier way to select all the parts of the is to simply click the key frame on the train layer.
- Convert to a graphic symbol named “train”.
- Now select it again (now “train” symbol) and convert it to a movie symbol named “train animation”.
- Double click on it to get into the symbol “train animation”.
- In the 1st frame position the train on the far right (outside the stage area).
- Insert a keyframe on the 60th frame (since the frame rate is 12 frames/ sec, and we want the train animation to take 5 seconds)
- Position the train to the far left (outside the stage area).
- Create a motion tween between the two frames.
Now test the movie [Control > Test Movie]
You will notice that the train enters from the right travels across the stage and exits from the left. And then the animation loops again and again.
[Via vineyardesigns]
Movie Clip Symbols in Flash CS3
-step 14
A movie clip symbol in Flash CS3 is like a mini- movie. The advantage is that it will play according to it's own timeline and does not depend on the main scene's timeline. It is great for repetitive animations that form a part of the entire flash movie.
Continuing with the tutorial let us make the wheel into a movie clip symbol as it has a repetitive rotation movement.
Wheel Animation
To make the wheel into a movie clip:
- Select the “wheel” symbol on the stage (which is an instance of the "wheel" graphic symbol)
- Convert it to another symbol named wheel animation.
- Select the symbol type “Movie clip” (not “graphic”).
Keyframes in Flash CS3
-step 15
[This is Step 15 of the Flash CS3 Animation Tutorial]
Keyframes in Flash CS3 is an important concept to understand.
The Timeline, Frames and Keyframes
The timeline consists fo many layers and many frames within each layer. In the picture of the timeline below the 10th frame of the layer "Train" is selected.
The first frames of all the layers are keyframes and are indicated by a gray background and black dot. The remaining frames are all blank.
Continuing with the tutorial let us begin to animate the wheel in the "wheel animation" movie clip by creating new keyframes within the movie clip's timeline.
Getting into the "Wheel Animation" Symbol
Let’s begin by getting into the symbol “wheel animation”. To do this:
- Double click the wheel on the stage.
- You will see the main stage elements fade out slightly and only the wheel remains clear.
- Also, you will see the movie clip symbol name “wheel animation” appear next to “Scene 1”.
- You can always click on “Scene 1” to go back to the main stage area.
Animating the Wheel - Part 1
Now let’s make the wheel go round.
- Click on the 5th frame in the timeline of the movie clip "wheel animation".
- Insert a key frame (right click + “Insert Key Frame”)
- Now rotate it 90 degrees counter clock wise
Modify > Transform > Rotate 90 degrees CSW
- Though it might look like the wheel is the same, Flash knows that the wheel has rotated and you will be able to see the results in the animation later.
- Insert another key frame at the 10th,15th and 20th frames rotating each time.
- Take a look at the wheel animation.
Control > Test Movie
- You will notice that the wheel is turning but the movement is rather jerky.
[Via vineyardesigns]
Change Colors of Symbols in Flash CS3
-step 12
We can change the color of a symbol by using the "Advanced" Color option in the Properties window.
Continuing with the tutorial let us make the train now.
The Train
- Make a new layer.
- This should be the top-most layer so that it appears right in front.
- We can reuse the rectangle, oval and line symbols to create the train by resizing them and changing their color.
- Drag the rectangle symbol from the Library onto the stage. This will create a new instance of the symbol.
- Resize it using the “Free Transform” tool.
Change the Color of the Reused Symbol
To change the color of this instance of the "rectangle" symbol:
- Select it
- In the Properties palette, select “Advanced” from the “Color” options dropdown.
- Click the “Settings” button next to it.
- Play around with RGB values till you are happy with the color.
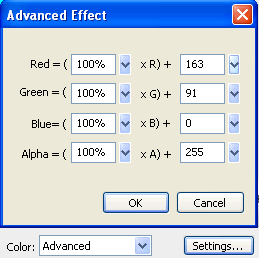 Reuse the “rectangle” symbol to make the chimney and other parts of the train as well.
Transform Options in Flash CS3
-step 13
There are various transform options provided in Flash CS3. These include resizing, distorting, skewing, rotating and flipping an object. You can also rotate 90 degrees clockwise or counter clockwise.
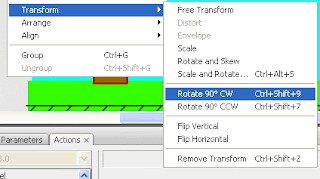
Continuing with the tutorial let us make the wheels of the train now.
The Wheel
- Use the symbol named “oval” to make a wheel.
- Resize it to circle by specifying the same width and height in the properties window.
- Change the color.
- Use the “line” symbol to make the spokes of the wheel.
- Resize and change the color.
- Use the zoom tool to zoom in and see small object better.

- Make another copy of the line and rotate it by using the Rotate 90 Degrees ClockWise option.
Modify > Transform > Rotate 90 degrees CW
- Select the wheel and spokes and convert it to a graphic symbol named “wheel”.
[Via vineyardesigns]
Paste in Place in Flash CS3
-step 10
Use "Paste in Place" to make a copy exactly one over the other in Flash CS3.
By default, Flash pastes in the center of the stage. There are 3 paste options under the Edit menu:
- Paste in Center
- Paste in Place
- Paste Special
Paste in Place
Continuing with the tutorial let us make multiple copies of the smaller slanting line right across the railway tracks.
The easiest way to do this is to:
- Select the instance of the smaller slanting line on the stage
- Copy (Edit > Copy)
- Paste in Place (Edit > Paste in Place).
- Then, use the right arrow key to move it a little away.
- Repeat the process.
- Once you have done around 5, select all 5 (select multiple by pressing the shift key while selecting), paste in place and move.
Align Objects in Flash CS3
-step 11
There are various tools to help you align objects in Flash CS3. These can be accessed from the Modify menu > Align option.
The "Distribute Widths" Alignment Option
Continuing with the tutorial let us ensure that there is equal spacing between each of the smaller slanting lines between the railway tracks. We will do this by using the “Distribute Widths” option.
To do this:
- Select all the smaller slanting lines (pressing the Shift key)
- Align > Distribute Widths
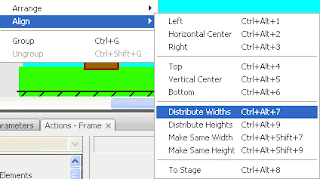
- You will notice that the lines are all neatly aligned equi-distant from one another.
Railway Track Symbol
Now our railway track is almost ready.
- Select all the horizontal and slanting lines that form the railway track.
- Convert it to a Graphic symbol named “Railway Track”.
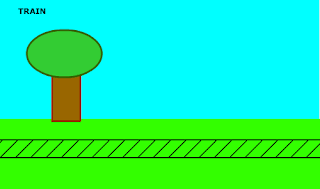
[Via vineyardesigns]
Draw Shapes (Oval) in Flash CS3
-step 6
Draw oval shapes and circles with the oval shape tool.
Continuing with the tutorial let us make a simple tree next.
The Tree
- Make a new layer called “tree”.
Oval Shape Tool
The Tree Top
- Making sure that the "tree" layer is selected, choose the oval drawing tool.
- To select the oval drawing tool you will need to click the tiny arrow at the bottom of the rectangle tool for a little while.
- Different shape options will open up.
- Select the “oval tool” option.
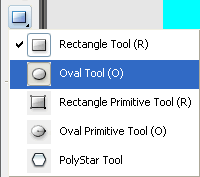
- You might want to have a light green fill color and dark green stroke color.
- On the stage, draw an oval shape for the top part of the tree.
- Double click on the oval you just drew to select both the stoke, and the fill.
- In the properties palette increase the stroke height to 3. Notice that the outline is thicker now.
- You can manipulate the properties of the stroke or the fill individually by select only the stroke or only the fill.
- Select the oval (double click so both the stroke and the fill areas are selected) and convert to a graphic symbol named “oval”. You can also get the “convert to symbol” option when you right click after selecting the shape.
The Tree Trunk
Now in the same “tree” layer, let’s make the tree trunk.
- Using the rectangle tool draw the tree trunk with a dark brown stroke color and a lighter brown fill color.
- Select it and convert it to a graphic symbol named “rectangle”.
- You will notice that the tree truck is showing where it overlaps with the tree top.
- To bring it behind we need to use the “send to back” option.
Modify > Arrange >Send to Back
- Select the tree top and the tree trunk (select tree top first, press Shift key, select tree trunk) and convert to a graphic symbol named “tree”.
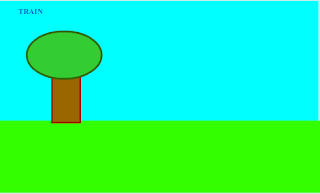
- This is how the stage looks now:
Draw Lines in Flash CS3-step 7
Draw lines in Flash CS3 using the Line Tool.
Continuing with the tutorial let's begin to draw the railway track using the line tool.
Railway Tracks
- Create a new layer named “railway tracks”.
- Ensure that it is the top most layer. If not, drag it to the top.
- Select the line tool.

- In the properties palette choose the color black, enter the line height “2” and select the option “Solid”.
- Draw a straight horizontal line across the stage.
- Select it and convert it to a graphic symbol named “line”.
[Via vineyardesigns]
Layers in Flash CS3-Step 4
"Layers" in Flash CS3 is another important concept to understand. Using seperate layers for seperate symbols placed on the stage will allow you to manipulate each one differently.
You can also decide which ones come in front visually by placing them on a higher layer. You can lock layers and hide layers by clicking on the little dots below the eye and lock icons next to the concerned layer.
So, let’s give the layer that the text is sitting in, a name. To do this:
Click “layer 1” and edit it to “Train Title”
Draw Shapes (Rectangle) in Flash CS3
-Step 5
You can draw shapes in Flash CS3 by using the various drawing tools provided.
Shape Tools
Now we will use the shape tools to draw the grass and tree.
The GrassMake a new layer for the grass. To do this:
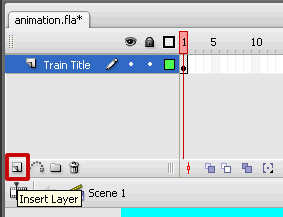
- Click the “Insert layer” icon at the bottom of the timeline.
- A new layer “layer 2” will appear.
- Rename it “Grass”.
Rectangle Shape Tool
Now let’s use the rectangle tool to make the green grass area. The fill color will be green and we do not want an outline for this rectangle. The stroke color indicates the outline color. Since we don’t want a stoke this should be “none”.
Set the stroke color to none in the tools palette (accessed by clicking the tiny triangle) in the stroke color icon.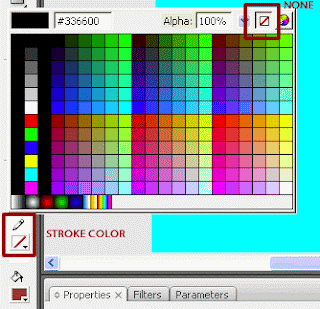 Choose the rectangle tool.
- Click on the stage where the top left corner of the rectangle (for grass) should be and drag (without releasing the mouse) to the bottom right corner of the rectangle.
- Once the rectangle is drawn you can change the fill color to green in the properties window.

- Finally convert the grass to a graphic symbol named “grass”.
- If you look at the “library” palette now you will notice that there are 2 symbols – ‘grass’ and ‘train title’.
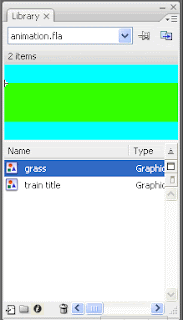 If you cannot see your library palette, go to Window > Library and you will be able to see it. As you create new symbols you will be able to access them from the Library too.
[Via vineyardesigns]
Create a New Flash CS3 Document
Step 1
Let's start by creating a new Flash CS3 Documents. To do this:
- Open Flash CS3 Professional
- You have various options including some standard templates to choose from. Templates range from advertisement sizes to photo slideshow and quizzes.
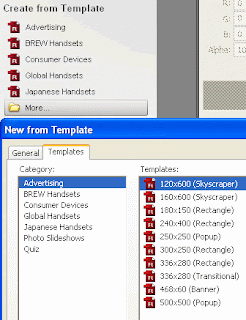
- For this tutorial however, we will not use a template.
- Click on Flash File (ActionScript 3.0) under the title "Create New"
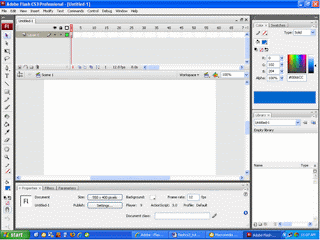
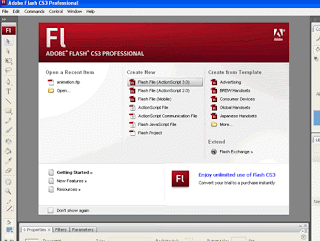 A new flash document is created.
Save the Flash File
- File > Save
- Give it a name e.g animation.fla (note that flash source files have .fla file extension) and save it in a folder of your choice on your computer.
Set up the Document Properties
- Modify > Document
- Give the title, description and dimensions (500x300 pixels). And choose a blue color for the background (for the sky). Click OK.
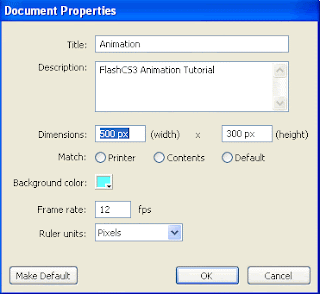
- You will notice that the stage dimensions and background color have changed to match your specifications.
- Take a moment to familiarize yourself with the Flash CS3 worspace as shown in the picture below. You will find various tools on the left, the timeline on the top, the stage in the middle, the properties window at the bottom and some other windows/ palettes on the right.
Recent Posts
Search Medhley
Followers
Blog Archive
-
▼
2010
(85)
-
▼
August
(19)
- Free Download Abstract Photoshop Brushes
- Hot iphone Sky Scene In Photoshop
- A Realistic 3D Baseball Cap Design in Photoshop
- Create A Green Planet
- Forming A Magical Four Piece Stardust Composition
- To Create a Contemporary Style Illustration Withou...
- Ideas For Creating Contact Pages
- Full Color Rollovers Made With Flash
- With Nudging Smart Objects We Can Create a Complex...
- Calendar Creation Using Scripting in Photoshop
- Using Floral Elements We Can Create A Shoe Adverti...
- Making Shiny Buttons Without Blends or Transparenc...
- Creating a Hellacious Flaming Skull Using Photoshop
- Killer Fashion Poster Design
- Creating A Fantasy illustration Design In A Rather...
- Creating A Curl Your Image Within 1 Minutes
- Create A Advanced Cloning In Gimp Photo Manipulation
- To Create A Mac style Wallpaper
- Create A Round Web 2.0 Button with a Metal Ring
-
▼
August
(19)


